
03 Turing Machine
Turing Machine turns the Workshop Computer into a random looping sequencer with two channels, configurable presets and multiple scales.
The Turing Machine was launched by Music Thing Modular in 2012, and is a very popular DIY synth project.
Panel
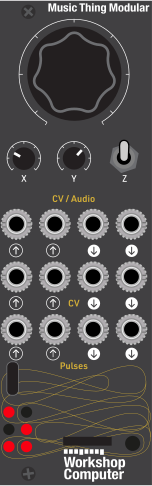 Random / LoopLoop LengthDiviplyResetPreset Select CVDiviply CVPitch Offset CVExternal Clock 1External Clock 2Channel 1 CVChannel 2 CVChannel 1 Note CVChannel 2 Note CVChannel 1 PulseChannel 2 Pulse
Controls
Random / Loop
Controls randomization and looping for both Turing Machine channels
Loop Length
Sets the main sequence loop length - 2,3,4,5,6,8,12 or 16
Diviply
Sets the clock division or multiplication for Channel 2, in relation to Channel 1
Preset 1: Selects the first configured output preset
Preset 2: Selects the second configured output preset
Tap Tempo: Tap the switch down to set the internal tempo when no external clock is connected
Inputs & Outputs
Inputs
Outputs
Inputs
Reset
A rising edge resets both sequences to their first step
Preset Select CV
Experimental CV control for selecting between the two presets
Diviply CV
Positive or negative control of the divide/multiply rate for Channel 2
Pitch Offset CV
Experimental quantized pitch offset applied to both channels
External Clock 1
Replaces tap tempo and drives the main clock
External Clock 2
Overrides the Channel 2 divide/multiply clock and clocks Channel 2 independently
Outputs
Channel 1 CV
Scaled DAC signal for Channel 1; output range is configurable in the editor
Channel 2 CV
Scaled DAC signal for Channel 2; output range is configurable in the editor
Channel 1 Note CV
Quantized pitch CV output for Channel 1
Channel 2 Note CV
Quantized pitch CV output for Channel 2
Channel 1 Pulse
Clock or Turing-bit pulse, depending on the pulse mode selected in the editor
Channel 2 Pulse
Clock or Turing-bit pulse, depending on the pulse mode selected in the editor
LEDs
Channel 1 CV Level
Channel 2 CV Level
Channel 1 Note Level
Channel 2 Note Level
Pulse 1 Activity
Pulse 2 Activity
README
Turing Machine Program Card
Turing Machine turns the Music Thing Modular Workshop Computer into a two-channel random looping sequencer. It produces evolving melodies, repeating CV patterns, and rhythmic pulses that can move gradually between randomness and locked loops.
This Program Card is based on the original Music Thing Modular Turing Machine, launched in 2012. Unlike a conventional step sequencer, you do not enter a specific melody. Instead, you steer a changing sequence until it finds a pattern you want to keep.
- Current firmware documented here: v1.5.3
- Watch a quick Turing Machine card demo on Instagram
- Open the Turing Machine web editor
Quick start
- Insert the Turing Machine card with the gold connector facing down.
- Press the small Reset/Load button beside the Program Card slot.
- Patch CV Out 1 to the Pitch input of the top oscillator.
- Patch Pulse Out 1 to an envelope, gate input, or another clocked destination.
- Tap the Z switch down several times to set a tempo.
- Put the Main knob near 12 o'clock for a changing random sequence.
- Turn the Main knob clockwise towards 5 o'clock to settle into a repeating loop.
- Use X to choose the loop length.
- Use Y to make Channel 2 run slower or faster than Channel 1.
If the pitch output is not in tune, calibrate the Workshop Computer with the Simple MIDI card. See Pitch calibration.
The central idea: random, slipping, or locked
The Main knob controls how much the sequence changes:
| Main knob position | Behaviour |
|---|---|
| Around 12 o'clock | Fully random; the sequence keeps changing |
| Around 3 or 9 o'clock | Slipping loop; mostly repeats but changes occasionally |
| Around 5 o'clock | Locked repeating loop |
| Around 7 o'clock | Double-locked loop, repeating a pattern twice the selected length |
Once a sequence changes, you cannot return to its previous state. That irreversibility is an intentional part of playing a Turing Machine.
Every Program Card has a unique serial number, which seeds its random sequence. Different cards therefore behave slightly differently. Starting a card with the Main knob in a locked position should reproduce that card's initial pattern until you randomize it.
Controls
Main — Random / Loop
Moves both channels between continuously changing random sequences, gently slipping loops, and fully locked patterns.
X — Loop Length
Selects a sequence length of:
2, 3, 4, 5, 6, 8, 12, or 16 steps.
The LEDs briefly indicate the selected length.
Y — Diviply
Divides or multiplies the Channel 2 clock relative to Channel 1. This creates slower, faster, and polyrhythmic relationships between the two channels.
CV In 1 is added to the Y-knob setting, so Diviply can be voltage controlled.
Z switch — Presets and tap tempo
- Up: select the first configured preset.
- Middle: select the second configured preset.
- Tap down: set the internal tempo.
The two presets can use different scales, ranges, pulse modes, note lengths, and other settings. Configure them with the Turing Machine web editor.
Inputs
| Input | Function |
|---|---|
| Pulse In 1 | Main external clock; replaces tap tempo and drives both channels |
| Pulse In 2 | Independent clock for Channel 2; replaces Diviply clocking |
| CV In 1 | Adds positive or negative CV to the Channel 2 Diviply setting |
| CV In 2 | Experimental chromatic pitch offset applied to both pitch outputs |
| Audio/CV In 1 | Experimental reset; a rising edge returns all sequences to their first step |
| Audio/CV In 2 | Experimental CV preset selection |
For Audio/CV In 2, approximately +1 V or more selects the Z-up preset; approximately -1 V or less selects the Z-middle/down preset.
CV In 2 accepts an approximate 0–1 V pitch signal and applies a chromatically quantized offset to both pitch outputs. This input is experimental and is not calibrated.
Outputs
| Output | Function |
|---|---|
| Pulse Out 1 | Channel 1 clock or Turing-bit pulse, selected in the editor |
| Pulse Out 2 | Channel 2 clock or Turing-bit pulse, selected in the editor |
| CV Out 1 | Quantized Channel 1 pitch CV |
| CV Out 2 | Quantized Channel 2 pitch CV |
| Audio/CV Out 1 | Channel 1 Turing CV with an editor-configurable range |
| Audio/CV Out 2 | Channel 2 Turing CV with an editor-configurable range |
When Pulse In 2 is connected, Channel 2 runs independently and Pulse Out 2 follows Pulse In 2.
Clocking
Tap tempo
With nothing connected to Pulse In 1, tap Z down in time with the music. The card calculates its internal tempo from your taps.
Main external clock
Patch a clock to Pulse In 1 to replace tap tempo. The external signal drives Channel 1 and becomes the source for Channel 2's Diviply clock.
After an incoming clock changes speed, Diviply waits for a second pulse before adopting the new rate. This can create musically useful transitions rather than immediately averaging the change.
Pulse In 1 works into high audio rates. At sufficiently high rates, the card can behave like a random wavetable oscillator.
Independent Channel 2 clock
Patch another clock to Pulse In 2 to bypass Diviply and run Channel 2 independently. In this mode, Pulse Out 2 follows the second external clock.
Configuring the card
The browser editor lets you configure both Z-switch presets.
Launch the Turing Machine editor.
The editor can change:
- Scale or mode
- Octave range, from one to four octaves
- Note length
- Channel 2 loop-length offset
- Pulse mode for Pulse Out 1 and Pulse Out 2
- Audio/CV output ranges
Available note-length behaviours include:
- Blip: approximately 1% of the note duration, with a minimum around 2 ms
- Short variable: controlled by an internal Turing sequence
- Long variable: controlled by another internal Turing sequence
The variable note lengths lock and randomize along with the note sequences.
Each pulse output has two principal modes:
- Clock: emit a pulse on every clock step.
- Turing: emit a pulse only when the relevant Turing Machine bit is
1, similar to the Pulse output on the original hardware Turing Machine.
Connecting the editor
- Connect the Workshop Computer's front USB-C port to your computer with a data-capable cable.
- Cycle the Workshop System's power so that the USB connection is detected.
- Insert and load the Turing Machine card.
- Open the editor in Google Chrome.
- Allow the site to access MIDI when the browser asks.
The editor communicates with the card using MIDI SysEx. Chrome is the tested browser; Safari on macOS does not support this editor.
If the editor cannot find the card:
- Confirm that the USB cable carries data, not only power.
- Turn the Workshop System off and on again.
- Refresh the editor after the card has loaded.
- Check that the browser has permission to access MIDI devices.
The older editor should redirect to the current version.
Restoring default settings
You may need to clear stored settings after updating the Program Card:
- Hold the Z switch down.
- Tap the Reset/Load button beside the Program Card slot.
- Keep holding Z until a fast animation appears on the LEDs.
- Release Z.
This clears the stored configuration and returns the card to its default settings.
Pitch calibration
The Turing Machine reads the precision-output calibration stored by the Simple MIDI card. If CV Out 1 or CV Out 2 does not play the Workshop System oscillators in tune, use Simple MIDI to calibrate the Computer first.
See the complete Workshop System calibration guide.
CV In 2's experimental pitch-offset function is quantized but is not itself calibrated.
Patch ideas
- Patch CV Out 1 and Pulse Out 1 to the top oscillator and an envelope for a self-running melody.
- Patch all four CV outputs to non-pitch inputs - filters, Slopes CV inputs - to create chaotic but rhythmic patterns.
- Send Audio/CV Out 1 to CV In 1 to modulate Diviply with another Turing sequence.
- Use a slow external clock on Pulse In 1 and a faster clock on Pulse In 2 for independent, intersecting patterns.
- Put Main near 3 or 9 o'clock for a loop that changes only occasionally.
- Configure one preset as a narrow melodic scale and the other as a wide, unruly range, then switch between them manually or through Audio/CV In 2.
- Drive Pulse In 1 at audio rate and listen to the Audio/CV outputs as oscillator-like signals.
More information
- Turing Machine card on the Music Thing Modular Program Cards page
- Current Turing Machine web editor
- Quick card demo
- The original Music Thing Modular Turing Machine
For implementation details, version-specific engineering notes, known issues, and testing questions, see TECHNICAL_NOTES.md.