
109 LIGHTPEN
LIGHTPEN drives an RGB sensor wand: three light-dependent resistors under
red, green and blue gels in a marker-pen body, powered from CV Out 1 and
read on CV In 1, CV In 2 and Audio In 2. Point it at the room or scan
printed colour, and the colour becomes CV, gates and audio.
The wand is four wires and nothing else. Each LDR goes straight from the
CV Out 1 plug to one input plug: the Computer's inputs are each 120k to
ground internally, which forms the other half of the divider, and its
outputs already carry a 1k series resistor, so no components and no ground
wire are needed. Each channel draws about 50uA.
X sets sensitivity and Y smoothing in every mode. Switch Up steps through
fourteen modes; Down is each mode's action — and in the three modes that
record, a quick tap of Down cycles the sound or behaviour while a longer
press still records.
The LEDs are two columns of three: the left (0, 2, 4) counts the mode as a
three-bit number starting at one, with Modes 8 to 14 counting again at half
brightness, and the right is a live meter of red (LED 1), green (3)
and blue (5). The meter shows the reading the modes act on — after
calibration, sensitivity and smoothing — so it is also how you set the card
up: a colour pinned at full brightness or staying dark as the wand moves
means the modes see that too.
1 RGB CV Mirror: colour as three CVs, plus threshold gates.
2 Triad Drone: red, green and blue set the levels of a chord's three notes.
3 Barcode Reader: swipe across a black-and-white code while holding Down,
and its bars loop as triggers — every element on one pulse out, the wide
ones on the other, with the black/white gate as CV. It also plays drums: a
bar going dark hits a kick and coming back to light hits a snare, or
clicks, crackle or shaped noise, tapped through with the switch.
4 Tape Scrubber: hold Down to record Audio In 1 for as long as you hold it,
up to six seconds, then scrub through the take by moving the wand across a
colour map, with a colour-controlled filter. Tap Down to switch between
scrubbing, repeating one of sixteen slices, and sweeping the loop length down
to a buzz. The take is stored lo-fi on purpose — 24kHz in eight companded
bits — which is four times the length in the same memory, and sounds like
cassette.
5 Synesthesia Voice: a 1V/oct voice whose filter, wavefolder and decay
follow the colour.
6 Colour Organ: hue picks a note in a scale, as calibrated pitch CV,
triggers and an organ tone.
7 Jog Wheel: the same take runs as a loop and the wand sets its speed,
from a nudge to a full shuttle into reverse, against a flywheel whose
weight the colour controls. Tap Down for a motorless platter your hand
drives entirely, or a brake that stops when you cover the sensor.
8 Prism Voice: a sustaining voice with FM, sample-rate crush and filter
on the three colours.
Modes 9 to 14 are EFFECTS. They all take audio on Audio In 1 and return it
on both audio outs, the three colours are the three controls, plus Main knob.
Tap of Down rotates which colour does what.
9 Colour Filter: patch audio into Audio In 1 and the wand holds all three
filter controls at once — cutoff, resonance and a continuous low-pass to
band-pass to high-pass walk — with drive on the Main knob and an envelope
follower on the spare jacks.
10 Delay: red is time, 10ms to 416ms, green feedback, blue mix. The time is
smoothed and interpolated, so sweeping it bends the pitch of what is already
in the line the way a tape delay does. Main is the tone of the feedback path;
Pulse Out 1 clocks once per delay period.
11 Reverb: eight damped combs into four allpass diffusers, retuned to 48kHz.
Red is size, up to a 2.4s hall, green the brightness of the tail, blue mix.
Main is pre-delay.
12 Freeze: the last 426ms is always in the buffer. Hold Down and it stops
writing, and three granular voices make a pad out of the moment that has just
gone — red grain size, green pitch, blue density, and Main scatters the grains
from an orderly stretch to a cloud. The hold LATCHES, so the wand hand is
free, and the voices alternate between the two audio outs for width.
13 Modulation: one LFO, with Main walking a six-stage phaser into a flanger
into a chorus by crossfade rather than by switch. Red rate, green depth, blue
feedback, and CV Out 2 carries the LFO.
14 Mangle: no buffer at all. Red crushes bit depth and sample rate together,
green folds, blue ring-modulates, and Main is the carrier pitch.
Hold Down at power-on to calibrate: five captures, one per tap. Show it
red, green, blue, white and black and it measures how much each gel leaks
the other colours and un-mixes them, so blue reads as blue rather than as a
grey lift on all three, then reports how well the gels separate, one LED to
five. Show it white for the first four taps instead and it calibrates level
alone — setting each channel's range and straightening its response, an LDR
being a power-law device whose raw reading bunches up at the bright end.
There is no mode to pick: white is the sum of the primaries, so the
captures themselves say which calibration was meant. It is saved to flash
and survives power-off.
Two pages to open full-screen on whatever screen you are scanning, both in
tools/ and both on the web — the calibration targets
(https://uglifruit.github.io/WorkshopLightPen/tools/calibration-target.html)
and nine colour maps
(https://uglifruit.github.io/WorkshopLightPen/tools/colour-maps.html): the
red/green field the tape scrubber was designed around, a hue sweep that
plays as a rising scale, barcodes for the barcode reader, and saturated
fields for the drone.
Panel
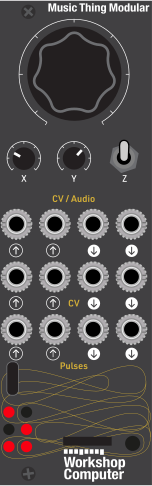 Mode parameterSensitivitySmoothingAudio in / pitchBlueRedGreenGate(unused)Audio / greenAudio / blueWand supplyMode CVTriggerTrigger 2
Controls
Mode parameter
Gate threshold (1), waveshape (2, 5, 8), playback speed (3), filter type (4), scale (6), jog depth (7), filter drive (9), feedback tone (10), pre-delay (11), grain scatter (12), phaser to flanger to chorus (13), ring carrier pitch (14)
Sensitivity
Global, every mode. 0.25x to 4x of the calibrated black-to-white range, unity at noon
Smoothing
Global, every mode. Slew on all three colour channels, from light to about a third of a second. Keep it low when scanning barcodes
Next mode: Momentary up steps to the next of the fourteen modes, exactly one per click. The left LED column shows which
Mode action: Freeze (1), chord type (2), record (3, 4, 7), latching freeze (12), colour rotation (5, 8, 9, 10, 11, 13, 14), transpose (6). Held at power-on it starts calibration instead
Option: In Modes 3, 4, 7 and 12 a quick tap cycles the drum kit, the scrub behaviour or the colour roles, while a longer press records, or toggles the freeze on and off
Inputs & Outputs
Inputs
Outputs
Inputs
Audio in / pitch
The audio in for every effect mode, 9 to 14; record source in Modes 4 and 7; 1V/oct pitch in Modes 2, 5 and 8. Unused in Modes 1, 3 and 6
Blue
Blue LDR return, read as a steady voltage. Wand channel, not a patch point in normal use
Red
Red LDR return. Wand channel, not a patch point in normal use
Green
Green LDR return. Wand channel, not a patch point in normal use
Gate
Note gate for the two synth voices, Modes 5 and 8. Unused elsewhere
(unused)
Not read by any mode
Outputs
Audio / green
Green as CV in Mode 1, the drum voice or element width in Mode 3, the processed input in Modes 9 to 14, audio in every other mode
Audio / blue
Blue as CV in Mode 1, the black/white gate in Mode 3, the processed input in Modes 9 to 14 (the right-leaning half of the grain cloud in Mode 12), audio in every other mode
Wand supply
Held at full scale as the excitation supply for all three LDRs. Not a signal output — no mode writes to it
Mode CV
Red in Mode 1, element width or brightness in Mode 3, envelope in Modes 5 and 8, calibrated 1V/oct note in Mode 6, play position in Mode 7, an envelope follower in Modes 9 to 12 and 14, and the LFO in Mode 13
Trigger
Red over threshold (1), every barcode element (3), a new note (6), the loop start (7), signal present (9), the delay's own clock (10), each grain (12), the LFO's rising half (13)
Trigger 2
Blue over threshold (1), wide barcode elements only (3), colour detected (6), high while playing backwards (7)
LEDs
Mode number, bit 0 (left column; half brightness past Mode 7)
Red, live level (right column)
Mode number, bit 1
Green, live level
Mode number, bit 2
Blue, live level
README
LIGHTPEN
A program card for the Music Thing Modular Workshop System Computer that turns an RGB sensor wand into a controller and a sound source. The wand is a whiteboard-marker body with three light-dependent resistors (LDRs) in the tip, under red, green and blue lighting gels. Wave it at the room, or scan printed colour with it (gradient maps, barcode stripes, rainbow strips), and the colour becomes CV, gates and audio.
Version 1.3.0. All fourteen modes build and pass the desktop DSP checks in tools/. A ready-to-flash binary is in UF2/lightpen.uf2 — drag it onto the Computer in bootloader mode.
Wiring the wand
| Jack | Connects to |
|---|---|
| CV Out 1 | common supply to all three LDRs (held at full scale) |
| CV In 1 | red LDR |
| CV In 2 | green LDR |
| Audio In 2 | blue LDR (read as a steady voltage) |
Each LDR goes straight from the CV Out 1 plug to one input plug — four wires, no other components. The Computer's inputs are each 120k to ground internally, which forms the other half of the divider, and its outputs already have a 1k series resistor, so the wand needs no resistors of its own and no ground wire. Each channel draws about 50µA.
This works best when the LDRs read somewhere near 120k through their gels. If yours are much lower in resistance, a resistor from tip to sleeve at each input plug (roughly the geometric mean of the LDR's light and dark resistance) will restore the contrast. Calibration handles the rest, including LDRs wired the other way round.
Controls in every mode
- X knob: sensitivity (0.25x to 4x of the calibrated range, unity at noon)
- Y knob: smoothing, from light to about a third of a second
- Switch Up: next mode (one mode per click)
- Switch Down (momentary): the current mode's action. In the modes that record or freeze (3, 4, 7 and 12), a quick tap changes the sound or behaviour while a longer press records — or, in Mode 12, toggles the freeze on and off. The one switch does both. In the effect modes a tap rotates which colour controls what
- Main knob: the current mode's parameter
LEDs. The six LEDs are in two columns of three:
- Left column (LEDs 0, 2, 4) — which mode you're in, as a three-bit number counting from one: Mode 1 lights one LED, Mode 7 lights all three. Three bits run out there, so Modes 8 to 14 count again from one at half brightness — brightness is the fourth bit. No mode is ever a dark column. It blinks for a second whenever you change mode.
- Right column (LEDs 1, 3, 5) — a live meter of red, green and blue, top to bottom.
The meter shows what the modes actually act on, not the bare sensor: it's the reading after calibration, the X-knob sensitivity and the Y-knob smoothing. Dark is calibrated black, full brightness is calibrated white, and turning X up brightens the LEDs too. That makes it the quickest way to set the card up — if a colour sits pinned at full or stays dark as you move the wand, the modes are seeing the same thing, so back the sensitivity off or recalibrate.
Two exceptions. During calibration the right column shows the raw readings instead, since there's no calibration to apply yet. And when you change one of a mode's options — a chord, a drum kit, a scrub behaviour, a scale — that option's number blinks across the first few LEDs for a second. In Modes 4 and 7 all six blink at the moment a recording actually starts, since a press only becomes a recording once it outlasts a tap.
Calibration
Calibrate once with the material you'll scan and the light you'll use. The card remembers it through power-off. If all six LEDs blink when the card starts, it hasn't been calibrated yet.
Hold the switch Down while powering on and release it. The card then takes five captures, one per tap of Down — red, green, blue, white, black. Each tap averages about a third of a second, so hold still through it. Up cancels and keeps whatever was already saved.
There's no mode to choose, because what you show it says which calibration you meant:
- For colour, show it the three primaries: use the calibration target page, which puts full-screen red, green and blue up in the right order, then white, then black card.
- For level only, show it white for the first four taps and black for the fifth. The card sees four identical bright readings, understands that you didn't offer it any colours, and calibrates level and curve alone.
It can always tell the two apart, because on a screen white is the sum of the primaries — so at least one sensor always reads white clearly brighter than the dimmest primary, while four looks at the same sheet of paper barely differ at all.
While it waits for each tap, the left LEDs show the live red, green and blue readings so you can aim, and the right LEDs show what to point it at: top for red, middle for green, bottom for blue, all three for white, all three dimmed for black. (Doing the white-only version? Ignore the colour cues and just keep showing white until it asks for black.)
Before it saves, it blinks two LEDs or five to tell you which calibration it recorded. Then all six light, and it restarts. On the way back up, a five-capture calibration reports how well your gels tell colours apart — one LED for barely, five for cleanly. Three blinking means the colours overlapped too much to use, so it kept the white/black part only. Those numbers are the quickest way to compare gels, or to see whether sleeving the sensors to stop light leaking between them helped.
If a colour barely changes between white and black (a loose sensor, or two taps on the same surface), that colour's LED flashes fast and the sequence restarts.
What calibration actually does. Black reads zero and white reads full on every channel, so the three gels read alike even though each passes a different amount of light. It also straightens each colour's response: an LDR's resistance follows a power law, so a raw reading bunches up at the bright end — worst on whichever gel passes most light, usually red, which otherwise races to full and then stops responding. With five captures it additionally un-mixes the colours, so blue reads as blue rather than as a grey lift on all three.
Two things to know: calibrate against the screen or print you'll actually use, because a different panel (or the same one in night mode) is a different set of colours; and after a five-point calibration, warm room light reads as mostly red rather than as a grey lift — which is more truthful, but does change how the ambient-light modes feel. Two captures remain the better choice for non-screen work.
Modes
1. RGB CV Mirror & Gate Tracker. CV Out 2, Audio Out 1 and Audio Out 2 carry red, green and blue as 0-5V. Pulse Out 1 is high while red is above a threshold, and Pulse Out 2 while blue is. Main: threshold. Down (hold): freeze the three CVs.
2. Triad Drone. A three-note chord: red sets the root's level, green the third's, blue the fifth's. It plays on both audio outs. The root is A2, and Audio In 1 transposes it (1V/oct). Main: waveshape, sine → triangle → saw → square. Down: chord type, major → minor → sus2 → sus4.
3. Barcode Reader. Black and white, not colour — the three LDRs are summed into one brightness, which is what a printed barcode actually varies. Hold Down and swipe across a code; release and it loops, up to 2.7 seconds. The take is cut into elements — runs of black or white — so what loops is the code's own bar pattern rather than a sampled waveform:
- Pulse Out 1 — every element, black or white
- Pulse Out 2 — only elements wider than that code's average, so the wide bars accent
- Audio Out 1 — the voice (see below), or the element's width when the voice is off
- Audio Out 2 — high through black elements and low through white: the code itself as a gate
- CV Out 2 — the element's width, or the scanned brightness when the voice is off
It plays drums. A quick tap of Down cycles the voice, and a bar passing under the wand strikes it — going dark hits one sound, coming back to light hits the other:
- Off — no voice; the outputs are as they were.
- Kick & snare — bright to dark is the kick, dark to bright the snare. Wide bars hit lower and longer.
- Clicks — both directions tick, dull one way and bright the other, so the code reads as a pattern of taps.
- Crackle — a thump at each boundary over a bed of surface noise that gets busier through the black runs.
- Shaped noise — no hits: a continuous band of noise whose pitch follows the scanned brightness and whose sharpness follows bar width.
Main: playback speed, 1/8x to 8x, with original speed in a dead zone at noon. Down: tap to change the voice, hold to record.
Coloured stripes still work, read by their lightness. Two practical notes: keep Y (smoothing) low while scanning or the bars blur together, and remember LDRs respond in milliseconds rather than microseconds — a supermarket barcode swiped at speed is beyond them, but a code printed or photocopied up large reads well.
4. Tape Scrubber. Hold Down and Audio In 1 records for exactly as long as you hold it, up to 6 seconds — the length of the hold is the length of the loop. The take is stored lo-fi on purpose (see below), which is what makes six seconds fit. Red sets the filter cutoff and blue its resonance. With a 2D colour map (green across, red up), the page works like a KAOSS pad. A quick tap of Down changes what green does with the take:
- Scrub — green places the playhead anywhere in the take, so moving the wand scratches it like tape. Silent when your hand is still.
- Slice — the take is cut into sixteen, green picks one, and that slice repeats. Beat repeat: it plays whether or not you move.
- Sweep — the take runs from its start and green sets the loop length, from the whole thing down to a sixty-fourth. Dragging down a gradient shrinks a phrase into a stutter into a pitched buzz.
Main: filter, low-pass → band-pass → high-pass. Down: tap to change behaviour, hold to record.
5. Synesthesia Voice. A complete synth voice: pitch from Audio In 1 (1V/oct, 0V = C3), gate from Pulse In 1. By default red is filter cutoff, green is wavefolder depth and blue is decay length. The envelope also comes out of CV Out 2. Main: waveshape, sine → saw → square. Down: rotate which colour controls what.
6. Colour Organ. The colour's hue picks a note: two octaves of the chosen scale spread around the colour wheel, so scanning a rainbow plays a scale. CV Out 2 carries the note (calibrated 1V/oct) and Pulse Out 1 fires on each new note. Pulse Out 2 is high while a colour is detected, and the audio outs play a simple organ tone. Main: scale (chromatic / major / minor / pentatonic). Down: tap to transpose up a semitone; hold for a second to go back to C.
7. Jog Wheel. The same recording as Mode 4 — made the same way, by holding Down — but played the other way round: the loop runs and the wand sets its speed. Blue is the platter's weight, so a bright blue reading gives you a heavy flywheel that takes a moment to answer. Red is a low-pass filter. CV Out 2 follows the play position, Pulse Out 1 fires at the loop start, and Pulse Out 2 is high while it runs backwards. A quick tap of Down changes the feel:
- Nudge — rest is normal speed, and the wand bends it either way, through a standstill and into reverse if you push far enough.
- Platter — no motor at all. Mid-grey is a true standstill and your hand drives it, like a palm on vinyl.
- Brake — rest is normal speed, but covering the sensor ramps it to a halt and uncovering spins it back up. Stopping is quicker than starting, so it behaves like a motor rather than a fader.
Main: how hard the wand pushes, from a gentle nudge to a full shuttle. Down: tap to change behaviour, hold to record.
About the take (Modes 4 and 7 share one). It's six seconds, stored at 24kHz in eight companded bits rather than 48kHz in sixteen linear ones — four times the length in exactly the same memory. That costs treble above about 12kHz and puts the noise floor around 32dB down, so it sounds like cassette. For a scrubber and a jog wheel that reads as character rather than as damage, and six seconds of phrase is worth far more than a second and a half of clean.
The eight bits are companded, not linear: the step size tracks the signal, so the noise sits 32dB under whatever you're playing at every level. Linear eight-bit would be cleaner on a loud passage and fall apart on a quiet tail — which is exactly where a scrubber spends its time.
8. Prism Voice. Mode 5's voice wired to a different set of controls, and a different character: it sustains while the gate is high instead of plucking. Red is FM depth from a second oscillator an octave up, green crushes the sample rate from clean down to a sixty-fourth, and blue is the filter cutoff. Same pitch and gate inputs as Mode 5, and the envelope again comes out of CV Out 2. Main: waveshape, sine → triangle → square. Down: rotate which colour controls what.
9. Colour Filter. The one mode that processes something rather than generating it: patch audio into Audio In 1 and it comes out of both audio outs through a filter the wand holds all three controls of at once — red is cutoff (about 230Hz to 7.8kHz), green is resonance, and blue is the filter type, walking continuously low-pass → band-pass → high-pass. The cutoff doesn't sweep all the way shut: with the wand in the dark the filter is closed but still audible, so a dim room reads as muffled rather than as a broken card. One gesture across a colour map sweeps all three together, which is the thing a filter with three knobs on a panel cannot do.
Main is drive into the filter, 1x to 8x through a soft clip. It makes the resonance sing, and it puts back the level a narrow band-pass setting takes away; at the bottom of the travel a full-scale peak still loses about 1.4dB to the knee, so treat it as a drive knob at minimum rather than a bypass.
The two jacks a filter leaves spare carry an envelope follower on the output: CV Out 2 is the level and Pulse Out 1 is high while there's signal, so the filtered audio can gate something else. Down: rotate which colour controls what.
With nothing patched into Audio In 1 this mode is silent — that's the normalisation probe holding the input at zero, not a fault.
Modes 10 to 14 are effects. They all take audio on Audio In 1 and return it on both audio outs, and they all follow the same shape: the three colours are the three controls, Main is the one thing a hand can't hold, and a tap of Down rotates which colour does what. With nothing patched in they're silent, like Mode 9.
They share one 40KB buffer between them — only one mode runs at a time, which is the only reason a reverb fits on this card at all. Arriving in one of these modes wipes that buffer over about 13ms, so you never hear what the last effect left behind; the dry signal passes through meanwhile.
10. Delay. Red is time (10ms to 416ms), green is feedback, blue is dry/wet. The time is smoothed and read with interpolation, so sweeping red bends the pitch of whatever is already in the line the way a tape delay does, instead of stepping to the new time. Sweeping it with the feedback up is the gesture this mode exists for. Main: the tone of the feedback path, from dark and tape-like to undamped and digital. Pulse Out 1 clocks once per delay period, so the rack can follow your hand, and CV Out 2 is an envelope follower.
11. Reverb. Eight damped combs into four allpass diffusers — the Freeverb topology, retuned to 48kHz. Red is size (a small bright box up to a ~2.4s hall), green is the brightness of the tail, blue is dry/wet. Main: pre-delay, 0 to 85ms, which is what separates a sound from its own reverb. All three rest states are the useful end of nothing: with the wand in the dark it's a small, dark, entirely dry room, so arriving in the mode passes your input through rather than drowning it.
12. Freeze. Audio runs continuously into the buffer, so the last 426ms is always there. Hold Down and the writing stops: that moment becomes the source for three granular voices, and you get a sustained pad out of something already gone. Red is grain size (20ms to 400ms), green is pitch (an octave either side of unity at mid-grey), blue is density. Main: scatter — at the bottom the grains march forward through the buffer in order, which reads as a time-stretch of the captured moment; at the top each one starts somewhere random in it, which reads as a cloud.
The hold latches: one hold freezes, another thaws, so you aren't pinning the switch down with the hand you need for the wand. A tap rotates the colours instead. While frozen the output is entirely wet — blending the live input back in just sounds like nothing is happening. The three voices alternate between the two audio outs, panned 3:1, so the pad is wide but still sums to mono; it's the one mode that doesn't send the same signal to both. Pulse Out 1 fires on each grain.
13. Modulation. One LFO and two topologies, with Main walking between them: a six-stage phaser at the bottom, a flanger in the middle, a chorus at the top. Both run every sample and the knob crossfades, so there's no switch to click across. Red is rate (0.25Hz to 8Hz), green is depth, blue is feedback — which is what makes a flanger ring and a phaser bite. CV Out 2 is the LFO itself, so the rest of the rack can move with it. The depth never reaches zero, so there's always movement to hear even with the wand at rest.
14. Mangle. The destructive one, and the only effect with no buffer at all. Red is crush — bit depth and sample rate together, from clean down to 3 bits held for 32 samples. Green is fold, drive into a triangle wavefolder. Blue is ring modulation depth. Main: the ring modulator's carrier pitch, 20Hz to about 2.5kHz — low for tremolo, mid for the classic clang, high for sidebands that read as a new timbre. The order is crush, then fold, then ring: folding a crushed signal keeps the staircase audible, while crushing a folded one just samples the folds.
Building
Requires the Raspberry Pi Pico SDK 2.2.0 (see pico_sdk_import.cmake, and CLAUDE.md for the exact toolchain setup).
cmake -B build -G Ninja
cmake --build build
This produces build/lightpen.uf2.
Targets to scan
Two pages, meant to be opened full-screen on whatever screen you'll scan — phone, tablet or monitor. Open them straight from the web:
- Calibration targets — the five calibration colours in capture order, with the LED cues and the display settings that would otherwise spoil the result.
- Colour maps — nine maps to scan once you're calibrated, each labelled with the mode it suits: the red/green field Mode 4 was built around, a hue sweep for the colour organ, barcodes and block noise for Mode 3, and saturated colour fields for the drone. space or arrows to move between them, esc to come back, number keys to jump.
Both live in tools/ in this repo (calibration-target.html, colour-maps.html) with the images in tools/colourmaps/, so they work offline too — just open the file.
Development tools
tools/lpsim.py contains integer-exact Python versions of the card's fixed-point maths (filter, oscillators, knob curves, calibration, the barcode edge finder, the hue-to-note picker, the jog rate law and tape positioning, the switch debounce), with checks. Run it with python tools/lpsim.py. It needs no hardware.
License
CC BY 4.0. See LICENSE.